

Post by mrjjj on May 21, 2018 10:50:23 GMT
Last Updated on: 12/03/2019 (December 3rd for those who struggle)
IMPORTANT NOTICE: This guide is no longer being updated since the last time it was updated and was long ago re-located to the wiki right over here. Mport for some reason still has this linked in the main screen when you boot up SSCM even though we have a wiki, and i suspect people keep clicking here and expect a fully updated info. Though honestly, Mport makes me wonder at times...
If you are after a simple and good merc newbie guide, check this one out by Mark: AKA Not Dying within 10 minutes as Merc
We have a wiki now! corpmercs.miraheze.org/wiki/Main_Page is the link. Most efforts are focused on it right now.
Fresh from the Brood and no idea what to do. Or perhaps a old veteran that forgot something. Its a lot more common than you think, allow me to assist with that.
The Guide is split into 3 PARTS. PART I is Basics. PART II is about Mercdonalds and how to fight them and what to expect. PART III is the Zurganid's bread and butter, the CARE system.
PART I - Basics
Once you spawn in, you become a tiny larva/grub that can move around a bit. Look to the top left of your screen. When you do so, you should see something like this picture down below.

Click on either CLAWS/ACID/RESIN/EXO to bring up a menu with things to buy from it. EVOLVE will obviously let you purchase it, and UPGRADE means you will get a sub-menu, usually for the main 4 to upgrade them even further. You will see several bodies in this sorta fashion on the first click or until you select a body.
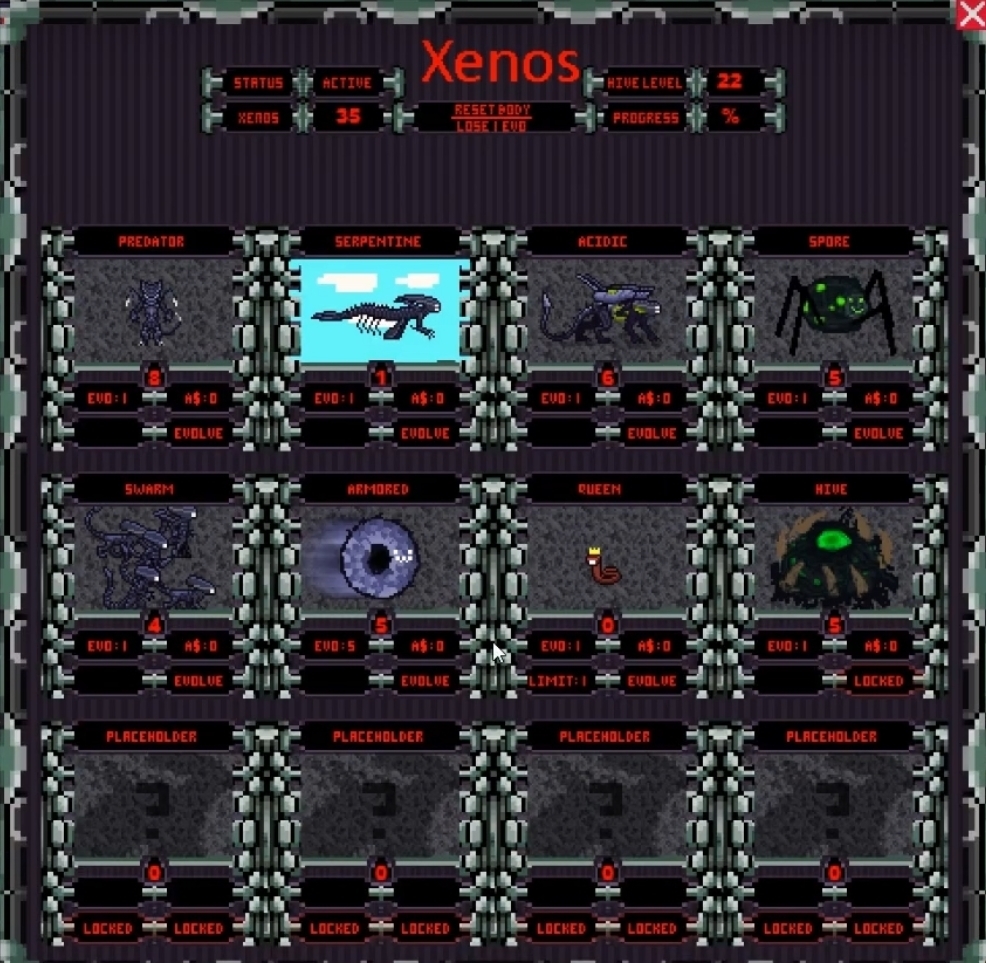
As you are most likely to be starting out, Acidic Body or Swarm Body would most likely be your best, as those are simple to grasp roles and don't require much skill to utilize. Avoid picking Queen or Hive as those are much more advanced roles with a entirely different playstyle. One you pick a body, your CARE menu will start working and you can pick up abilities and upgrades.
Before you do anything, ALWAYS Make sure to read what abilities actually do that you may get, do not just click evolve on everything.
Now that we got that out of the way, here is the explanations.
- Claws increase your melee damage and make you more red in color.
- Acid makes you digest faster and able to melt stronger objects and makes certain abilities stronger
- Resin makes you grow and get health back much quicker.
- Exoskeleton increases health and mass, but decreases speed.
While you are waiting, you are "growing", by default you are at 0/20, so you need 20 points to grow, which is being filled up by 5 points each tick. Resin adds 2 with each investment to the initial value, so with Resin 2 you get 9 each tick. However each time you buy something in any non-pure resin tree (That even includes Resin Abilities), this increases growth max by 10, becoming 0/30. This means that a end-game Zurganid can have up to even 0/120 growth required with most of his primary tree upgraded. But be Warned!
There is a soft limit on how many same body types you can have before you start taking hits to growth. They are 6, 11, 16, and 21 respectively and no more from then on. Each limit passed makes you grow slower by 2 seconds. This means that if you somehow have 21 or more Banelings, they will all grow, assuming max Resin, at 7 points instead of 15.
With this in mind, remember that your choices don't have to be permanent, Reset Xeno will kill you and give back all your points, However! This will cost you 1 point, so don't reset at the start or too much, reset only when needed, like for example in late-game when you are a swimmer and you are boarding the ship. Since this is becoming a bit of a problem. For the love of the brood, DON'T HESITATE TO RESET WHEN THINGS LOOK BAD. There is no serious use being a useless swimmer on Saltshaker when you can sacrifice 1 point and become a Demolisher when you lack them or getting spitters when most of your hive is already swarms. Its what it was made to do, not just mitigate bad choices.
There is also other hidden abilities you can't see right now, but in PART III i have the entire list of what you can get, at which point, and when you require them, and what they do. some of the most basic ones you get is either Claw's Pounce or Acid's Acid Spit/Melt as a example . I should mention as well that most abilities expect very few ones can be placed in your ABILITY slot to the right of your hands, it will stay there and can be activated by using shift+click or middle mouse click.
Now once you read through and got your abilities, you may ask...the hell do i do? how do i get more evo points? who are my enemies? where are the facehuggers?! How do i get out?!
Worry not, to get out, there is a button called "Teleport" and "Exit" to the left side of your screen. Clicking Teleport will bring up the list of spores and anything that you can teleport to, while Exit will let you get out of the Brood itself. Afterwards all you simply do is find corpses at the start and consume them using the devour ability, which should start on the bottom left, its icon looking like teeth, just click it and then click on a corpse you wish to eat and wait a bit, the corpse will start being digested. Keep in mind that corpses aren't instantly digested unless you are ACID 10, do NOT go fighting anyone while you have one inside you. If you absolutely must fight then announce you put a corpse somewhere, preferably hydro and leave it there, you will simply hurt your team by dying with all the corpses you just ate near a sentry or mercs. Also there is a very minor chance of cowboys running around, armed with revolvers. They can be a bit of a pain, but they often just try to survive, since they aren't friendly to both you and Mercs, and tend to get shot a lot by them.
One of the things you also may notice in your journey is these "other" aliens, who seem to be wandering around and doing nothing, and are called "Mindless Hunter" or "Mindless Sentinel". These are your versions of Cannon Fodder, and can be spammed out by Hives and Queens. There also exists the Mindless Guard or Ape, depending on how you want to call it and Facehuggers summon-able by Queen.
Once you have started eating corpses, a big announcement in chat will start showing up, saying the hive now has enough biomass to evolve, but then you will notice at a certain time that your "experience" has granted you a extra point, now the hell does that mean? It means that you have been granted a extra point due to how long you been in the hive since the start, as a round-start xeno you will have more points compared to later xenos, so if you have 15 points, the late-join xeno will most likely have 12 or less instead. Use this blessing well!
Remind yourself that you are ultimately expendable unless you are the hive or queen. Zurganids as a whole drop 1-point core, 2-points core, 4-points core. 1-point core are dropped by Mindless 25% of the time. 2-point cores are dropped by all Player Zurganids upon death and Mercs need A LOT of these to even make you worry about death, although Spore Body drops these cores 25% of the time. 4-point cores are dropped by the Queens and Hives. However if you die in larva form, you do not drop any cores. In larva form you are also weaker than normal, mostly in health, however with some of your abilities locked until you grow like Pounce, although spit and some minor other ones will still work.
When you are fighting mercs, use speed to your advantage if in open terrain, they are SLOWER than you unless you are high-exo xeno. In more closer terrian, mercs can bunch up in a hallway ontop of each other, where you can use acid or banelings to destroy them and cut them off. Your claws also have a 2-tile range, allowing you to hit them while they are unable to hit you in melee, its a VERY useful thing and you should keep it in mind while fighting in melee, only mercs that have a 2-tile melee range currently are Veterans with a Halberd.
Also, there is a few damage types in this game and armor types, working like rock paper scissors, them namely being:
PADDED Wins against IMPACT but looses to PIERCING
PLATE Wins against SLASHING but looses to IMPACT
ADAPTIVE Wins against PIERCING but looses to SLASHING
There is also BRUTE and BURN for xenos and mercs to suffer, BRUTE is well, BRUTE, the normal damage type you will be dealt, but BURN will come from flames, lasguns and others, they aren't too much different from normal guns, but being hit by them makes your recovery take much longer, so you don't heal it as fast as BRUTE. As of recently, STAMINA and TOX is also a thing for mercs. You don't need to worry about it as a xeno however, but it affects how long does the merc stay in crit and their abilities, though you have no way right now to tell how much they got. If you do see a corpse that seems to be coughing and has this odd red cross appear on it occasionally, that means they are in CRIT. They will slowly die and are KO. Beware however, that they can be healed in this state, so you should finish them off ASAP if its near front-lines, least it comes back to mercs to be healed.
Right now the weapon/armor types aren't too important but keep it in mind in the future. Your claws do SLASHING with some bodies giving you IMPACT. Do remember if PADDED goes up against SLASHING for example, it would be just okay, not great, but not terrible either. Xenos start with SLASHING by default, so most merc armor will resist most of their damage but there is ways to subvert it, see the Third PART.
Your objective is located in the top-right corner. You start with 0/100 Strength Progression, which is for trying to launch pods onto Saltshaker that is producing a ECM effect (Unless they forgot to, then you have free reign to board it when you want to). You need to reach a 100 in order to have your pods not instantly die to the ECM. To reach it, you must infest the colony, reach higher hive levels and kill mercs.
Once mercs arrive there is a announcement that tells you your primary objective and the way to win, which is to disable Important Ship Parts(ISP), These are on the Saltshaker, 2 are on Lower Deck, being Engineering and Gunnery and 2 on Upper Deck, being Bridge and Cryo. Destroying Engineering makes Daemons appear and destroying Cryo makes it impossible for new players to join as mercs. Once you manage to get to a ISP, just simply bash it or spit at it until its destroyed.
After you do so, Saltshaker will crash and News start playing. Depending on how well you did and what happened, your victory rank/score will be different. This may affect Antagpoints in the future or give a achievement. Your score is reduced by Mercs as well as your score reducing Mercs. Should you and Mercs tie, you automatically gain a +1 for a Minor Victory always.
0. Defeat - (You have achieved absolutely nothing. Your mission is a failure and your hive is destroyed. Your existence is no longer necessary. Happens when Mercs/Other win.)
1. Minor - (You did not achieve a significant victory, but you have achieved some sort of small victory despite this. Your existence is under question.)
2. Regular - (A satisfying victory. You have repelled the hostile biomass and the location is yours to harvest. Grow your hive and unite with us.)
3. Major - (Exceptional performance. The hostile biomass has been destroyed, the planet is ripe for a harvest and your hive is strong. Unite with the rest of us and prepare.)
4. Crushing - (Truly you and the hive are Paragons among us. The hostile biomass never truly stood a chance. We shall unite with you shortly. Lead us to worthy planets.)
| Zurganids Active | Gives +1 to Victory Score | Default Score for existing. Can be disabled by being Nuked. |
| Off-Map Main Hive Alive | Gives +1 to Victory Score | Your main respawn point. Can be disabled by Mercs jumping away but the round goes overtime or Nuke. |
| Objective Goal Reached | Gives +1 to Victory Score | Depends on the objective of the round. Upon completion grants the victory point. Round-Ending usually. |
| Beating Mercs before 12:30 game time. | Gives +1 to Victory Score | Time-Based. In reality you have 20-15 minutes as mercs land between 12:10-15. Round-Ending. |
And for Mercs:
| Saltshaker/Ship Alive | Gives +1 to Victory Score | As long as the Saltshaker exists, the Mercs always have a +1 just like you for existing. Ends round if it crashes. |
| Majority of ISP's Alive (3/4) | Gives +1 to Victory Score | The Mercdonalds won't appreciate the damage done to the ship. Destroy some even if full victory is not possible. |
| Objective Goal Reached | Gives +1 to Victory Score | Varies from map and gamemode. Stuff like getting enough cores for nuke and etc. |
| Proper Ship Order Completed | Gives +1 to Victory Score | Varies like the Objective. Can be either doing the Exterminate Order, Jump Order or such. Ends Round. |
This is about as far as i can get with basic newbie stuff that is asked often, the PART II and PART III of this guide are simply just what MERCS you will face and full CARE ability list, which a newbie/veteran might still find useful i guess, although they aren't super vital to know, so you are free to go back in the game now, this guide may need some improvements there and there still.
PART II - Mercdonalds Terror Types
The Merc threat is strong and varied, from silly cardboard boxes to serious looking space-knights, they are deadly and will put you down in no time with their guns and are probably insane. This guide will quickly cover all the types that will appear. Note that most of their weapons and armor tend to be samey. As time goes on, will include any important weapons that you REALLY should watch out for.
SQUADS
- ALPHA - The Infantry Rush Squad. They are usually the blob of most, not being too great at anything or bad besides rushing with pure numbers. They are easily identified by their red colors and typical "Intelligence". Most newbies or people who want to fuck around join this squad, so most of them will be just running in and trying to gun you down as much as they can with insane amount of boolets. Beware that even despite the clusterfuck surrounding ALPHA, they can respond very quickly to some situations. If you want to try some tactics, ALPHA will be the one you will most likely succeed to use it on, especially if they have no support. They have the most kits. If you manage to annihilate ALPHA, a vast bulk of the Merc forces will be gone, granting you HUGE amounts of Points if you eat them and will allow you to focus on the other, much more specialized squads and counter them easier than before, without needing to prepare for a blob of enemies, and a offense actually becomes somewhat possible.
- BETA - The Air Superiority Squad. They are not as picked as often usually, but when they are, the sky can be terrifying. They are identified the most easily, just look at the sky, and if someone is flying that isin't a Zurganid Swimmer or Dropship, then its a BETA flightman. They can wield any weapon most of the time, and will tend to suppress fire from the sky. They are very fast and are often hard to hit as a spitter and there is currently no AA besides swimmers to dispose of them. Your best would be to either make Brood in caves or anywhere where its hard/impossible for BETA to attack from above. Your other option is get enough Swimmers to overwhelm and kill them, since their armor is usually garbage and won't take as many hits as other mercs do to even a CLAW 5 Zurganid. Just catch them first. They currently have the 3rd most kits. If you manage to de-throne BETA from the skies, your swimmers will be capable of harassing shuttles much more and easier, and your ground forces and allies do not have to worry about attacks from the above as much. While they won't give you many points, it is very good to not be bombarded from the above constantly and having to keep the hive in enclosed spaces.
- GAMMA - The Heavy Defense Squad. Currently the only Squad that can field Exosuits, a special type of armor you can find here in the mercdonalds kits and support guide. Ctrl+F for "Exosuit". If you are somehow unable or to lazy, Exosuits basically sacrifice their back slot and belt in order to gain energy and health of a exosuit. They have infinite ammo as long as they resupply their energy and currently wield weapons that use that Energy for ammo (Not to be confused with actual Energy/Laser Weapons). However this does leave them slower than any other squad, and forces them to stick to their vehicles, in this case TONK, and various other disadvantages like unable to buckle and etc. They can identified by their typical heavy looking armor or orange colors. Underestimate on your own risk though, their vets/engis vend the TONKS and their weapons are capable of heavy support fire as it gets recharged by their energy. If you can take out their Vehicles, your job to kill them will be much easier. Note that they can and usually will repair their Exosuits with repair patches and Vehicles, but currently for their Vehicles its rather limited by amount of welder fuel and hasn't been designed fully yet. They have the least amount of kits in the game currently, just short of BETA. If you destroy their TONKS, the squad will be forced to retreat to Dawn Crawler/Saltshaker constantly to recharge themselves, limiting their time on the frontline. If you manage to stop the bulwark of GAMMA, you will find most defenses much easier to penetrate than before, with most Vehicles being destroyed or out of action and their best engineers consumed. They will give you a good amount of points and you won't have to worry about spending countless amount of time throwing everything at the enemy defenses and making progress pixel by pixel and enduring the massive suppressive fire from the Vehicles and their ability to destroy terrain.
- DELTA - The Veteran Assault/Special Ops Squad. While GAMMA is the more slower, restricted and defensive with vehicles, DELTA is the much more mobile version, focused on a powerful and overwhelming offense and support. Their most basic strategy can be 8 Veterans firing in one direction at best, but with a experienced crew they can become actual hell to deal with, like GAMMA when entrenched. While they are not likely to have many numbers in the first place, probably even less than BETA, their heavy firepower will more than make up for it when combined, creating a deadly push whenever needed. Expect to see them either being at special objectives, being at the front-lines and pushing or giving support fire from the back. Unknown how many kits they currently got. If you manage to counter and eliminate DELTA you will find your defenses not as easy to breach through and a lot of Merc support fire being significantly less. While the Vehicles of GAMMA can still be a huge danger in Merc Pushes, without the DELTA powerful and rapid support it won't be as unstoppable as it seemed to be before. The amount of points they will give you is pretty substantial and will help unlock some trees of CARE. The Mercs will also need to separate their Squads if DELTA hasn't achieved the other objectives if they want to get them or contest yours, although this isn't present in the game yet so for now you just massively reduce the amount of boolet flung your way.
- CREW - The Ship Squad. They are its guards, maintainers and etc. Some Mercs can join it and they do sometimes, but Command tends to be automatically in it. If you are wondering why Engineering has 10 sentries, its probably the cargo and engineers in this squad fucking with you. 500 Orbital Screeches? That's them. They are at best a small hindrance, and at worst a absolute disaster to deal with. They will probably be the last line of defense assisted by the other 4 Fractured Squads if you have been doing well but if you haven't been doing well at all, its going to be utter hell to get through all 5 of them with minor losses. Once you beat the CREW and CO, the game is more or less won and there will be a very few remnants left running around and you should have no trouble finishing the round, just make sure to not fuck up and let them jump away or let Exterminate complete.
COMMAND
- Commanding Officer (CO) - The Final Boss of Saltshaker, he has Heavy Armor that is focused against Slashing, making him a very formidable opponent, ranging from Darth Vader, Marine CO, NT Captain and Crusader King and more to come. Wielding usually a Broadsword or E-Sword or more fancy and dangerous shit, do not underestimate him. But should you kill him, his corpse is worth a ton.
- Overwatch (OW) - Currently are split into 4 squad variations. They oversee what each squad does and attempt to command them to do something, which usually ends in them trying to herd cats. They are more or less at the same power level a Merc usually is and shouldn't be too much trouble. For now they don't give out anything besides points sadly. At least for now that is. They Are Screeches and are known as. Alphawatch. Betawatch. Gammawatch. Deltawatch.
- Boatswain (QM) - If the CO is too busy fucking around in the Bridge or the Planet, then the Boatswain is busy fucking around in Engineering trying to summon the [REDACTED] or [REDACTED], you will rarely see him, but he can order more heavy weapons, grenades, ammo and other stuff that makes your life more painful.
- Squad Leader (SL) - They are almost unremarkable from the mercs and currently have very little differences between each other in appearances right now, they are basically just fancy grunts that shout orders and get some special gear that's just a bit better and cooler looking, give no bonus abilities whatsoever. Appear as Ground Leader. Flight Leader. Armored Leader. Assault Leader.
- Pilot Officer (PO) - The metal fliers. They wear rather small amount of armor typically, focused much more on mobility and support if they are ever on the ground without their shuttle or off doing something. You won't see good PO's much as Zurganid unless you are a Swimmer constantly harassing them. As of right now they aren't that much of the threat by themselves expect the shuttles they pilot, like a Protobomber for example and are very hard to knock-off the sky if they are competent and give no bonus abilities. Appear as Transport Pilot.
STANDARD
- Mercenary - As basic as you can find, they can wield anywhere from rapid-firing Calicos, to strong-hitting SCAR's, to versatile M41A, and can attach any attachments to any gun and many others, their armor is Medium and focuses on Slashing, but there is a couple of armors that are a exception, which focus on Piercing or Impact instead, give Combat Knowledge when consumed, which gives you the ability to learn Lunging Strike. Squads and their names that have them are: Mercenary. Flight Merc. Armored Merc.
- Veteran - Because Mercdonalds needed a bigger boot for you, they are equipped with L6's, Snipers and Rocket Launchers, all while wearing Heavy Armor that makes Slashing a pain, they will usually look fairly bulky and slower than your average merc, consuming them makes you able to get Second Strike, Advanced Stealth and Quick Dry Resin. Only DELTA has veterans.
- Medic - Probably your most hated enemy on the field after you nearly killed somebody, however at least you can tell its them by that teal/cyan looking belt on them, but otherwise they are pretty much just Mercs but with MORE MEDICINE! eating one lets you learn Metabolic Enhancement and Pheromone Glands. Squads that have them are: Medic. Flight Medic. Assault Medic.
- Engineer - Do you like sentries? He is going to build more now, and they are going to eviscerate you without some careful planning, they always typically look like marines or Mechanicus from 40K, so they are probably the easiest role to identify aside from Reporter, their biomass gives you Enhanced Resin Mix. Squads that have them are: Engineer. Mechanic.
- Crewman - They are typically on the ship serving the QM, or fucking with the engine as usual, or printing themselves 6 BC's, whatever they can do out of pure chaos inside their hearts, they give you Optimized Resin Sacks. Only CREW has them.
- Reporter - Some guy was picked, given a camera and told to go crazy, this is what the Reporter is, just a guy with a camera and with some gear to protect himself, another easy role to identify, they are even more useless than Mercenaries, as they give you nothing to learn new from, not even able to make your own camera. Is present in ALL squads.
- MEAT - The truth behind Mercdonalds. They spawn from MEAT Lockers in the Morgue on upper decks, being fed countless bodies of humans, monkeys and alike. They are fairly strong, being very dangerous in groups and spawn a l o t, however can only be triggered once. Can be controlled by players if they stand over the locker as Ghost (although this mechanic is under scrutiny by Mport, seeing as how some people have started to refuse to become Zurganid, Marine or Wendy and etc and waited until MEAT.)
VEHICLES
- Tonk - Your nightmare. The Tonk as of right now has heavy armor and has a big 1000 health pool. It can be driven by one guy and has a turret, with the one controlling the turret being exposed. but even one merc is still a danger. It has 2 HMG's (One for driver, another for turret) with insane fire rate and a total ammo capacity of 800 rounds for both, only the Demolisher can hope to tank this for more than 2 seconds. Its other weapon is its Cannon, which has a fairly slow fire rate and a ammo capacity of 40 rounds, but not only does it have a sizeable AOE, it deals a crapton of damage too and may stun because everything usually dies when hit by this, but it does require someone to control the turret. You NEED teamwork, Demolishers, Max Claws Rush, Swimmer Drop, Acid Spike or Acid Spray to take this down or until it runs out of ammo, otherwise you are not taking it down for a long time. TONKS can be spawned by GAMMA Mechanics by acquiring their Tonk Kit. Marines sometimes also have TONKS.
- Dawn Crawler - The primary Enemy Fortress. While its hard to call this a vehicle in some way, it is definitely one hell of a armored turtle. The Dawn Crawler will be your Nemesis for most of the game before the CO and Saltshaker. Dawn Crawler has 4 health bars each having 1000 health, requiring the previous one to be depleted before moving onto the next one. The damage can be fixed by engineers, but once a entire health bar is gone, it can't be repaired. Each health bar depleted makes a breach inside it, allowing you to board it from multiple places instead of the hallway of doom.
PART III - CARE Ability List
Here is the FULL list of CARE abilities you can get, what things you need to acquire it, under which tree it is, and what the hell does it do, so let's go.
RED means what the ability did was forgotten and its unreliable, so it needs a FIX ASAP.
ORANGE means the name might be incorrect and was done from memory, but otherwise what it does should be correct.
PURPLE means this ability needs you to devour somebody and it usually shows who next to it.
BLUE means this is a BODY, choosing one will not let you pick others unless you reset.
GREEN means this ability is currently turned off or WIP
CLAW 0
| ACID 0
| RESIN 0
| EXOSKELETON 0
|
CLAW 1
| ACID 1
| RESIN 1
| EXOSKELETON 1 |
| CLAW 2 | ACID 2 | RESIN 2
| EXOSKELETON 2 |
| CLAW 3 | ACID 3 | RESIN 3 | EXOSKELETON 3 |
| CLAW 4 | ACID 4 | RESIN 4 | EXOSKELETON 4 |
| CLAW 5 | ACID 5 | RESIN 5 | EXOSKELETON 5 |
Hey if you managed to read through this, i hope you enjoyed the guide and understood anything. (BBCode is something)

